|
Video Input Format
|
NTSC/PAL
|
|
Capture Function
|
Local storage/Loop Capture
|
|
NightVision
Function
|
36 LED Lamps;The infrared ray cancover 30 meters.
|
|
Capture Mode
|
Motion Detect record,Continuous Record, Detector Alarming Record Alarming.
|
|
Control Mode
|
Telecontroller Spacious Distance 500m
|
|
Resolution
|
640*480(VGA)
|
|
Menu Display Language
|
English
|
|
Support(Storage Medium)
|
TF Card(Support 16GB)
|
|
Power
|
DC 12V(>500MA)
|

Ⅲ.Operating Manual of Capture Mode and the Telecontroller
The main feature of SMC is that it has three capture mode. The below is :
1、 Motion Record(MR)
When the target pictures change, the recorded function will be initiated automatically until the target pictures stop moving.
press the button “A” on the telecontroller, then enter the motion record mode, “MR ”appears on the lower-left corner.
2、Continuous Record(CR)
It can record automatically whether the pictures captured changed or not. It is suit particularly to the important occasions.
Press the button “B” on the telecontroller, then enter the continuous record mode, “CR ”appears on the lower-left corner.
3、Alarming Record(AR)
Wireless Magnetic door detector in the basic configuration is the outlay detector. When function of the detector protection are initiated, it will record continuously and the external alarming will sound for 30 seconds every time it is triggered; otherwise, once being triggered, the internal alarming Warner sounds two times every five seconds (stop the alarming by pressing the Telecontroller) to serve as a remind.
Press the button “C” on the telecontroller, the external detector enter the protection mode. “ AR” will appear on the lower-left corner.
4、Cancel all the functions
In this mode, it can only do real time monitoring,it equals to an IR CAMERA
Press the button “D” on the telecontroller to enter the standby mode; “ S” appears on lower-left corner;when there is sounding of external speaker, if you want to stop the operation, you can press this button.

Ⅳ.Specification of the Indicators
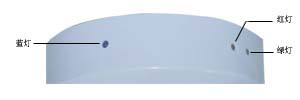
Three-Color indicators of red, green and blue on the mainframe, and their functions are listed as below:
1. Red indicator is the written indicator. The indicator will light when taking photos and record
them into TF card. The indicator goes out when the writing is finished.
2.Green indicator is the power indicator. When the camera power is on, the green indicator will start to flick, when no card or formatting of new card it will be quick flashing status..
3.Blue indicator shows modes of taking pictures. Slow flick indicates the motion detect record, quick flick indicates the continuous record, and normally on indicates the detector alarming record.
Ⅴ.System Time Setting
1.Take out the TF card, insert it into the card reader, and then plug the card reader into the computer.
2.Be sure system time of the computer is correct.
3.Open the browse software affiliated with the video camera, click "other functions" and "time synchronization" on the upper-left corner, then the window of "time synchronization" appears, choose the disk of TF card, then synchronize the time.
4.Delete the hardware safely in accordance with windows suggestion.
5.Take out the card reader from the computer and then pull out the TF card. Insert the TF card into the video camera again.
6.Power on, the system time is modified automatically.
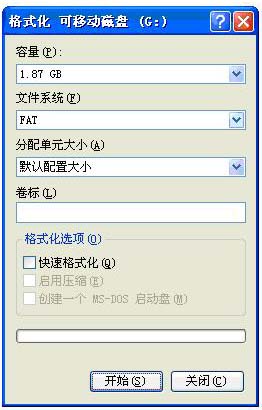
Ⅵ.Usage Method of New TF Card
